一、导航菜单
1.函数(开启导航菜单功能)
原来是没有菜单功能的。

/*
register_nav_menu( $location, $description )
函数功能:开启导航菜单功能
@参数 string $location, 导航菜单的位置
@参数 string $description, 导航菜单的描述
*/
register_nav_menus(array(
  'zhudaohang' => '网站的顶部导航',
  'footer-nav' => '底部快速通道菜单',
));
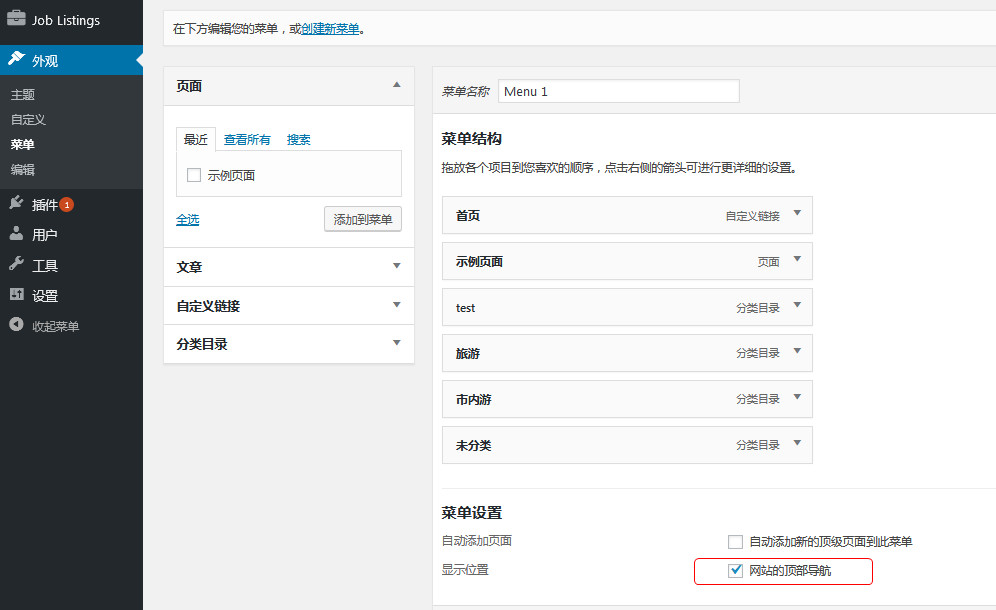
将上面的代码放到functions.php,就会显示“菜单”选项。
备注:
左边是别名,右边是名称。别名会用在导航栏的调用上,名称则显示在菜单后台页面上。
(二)顶部导航菜单
1.创意导航菜单
2.显示导航条
<?php
/*
wp_nav_menu( $args )
@参数 array $args, 传递此参数时用array(成员参数名=>成员参数值)
特别说明:
调用导航菜单时,可以直接复制以下代码。然后根据需要删除成员参数,是放到模板文件,不是function文件
*/
wp_nav_menu( array(
  'theme_location'	=> 'footer-nav',						        //[保留]
  'menu'		=> '',									//[可删]
  'container'		=> 'div',							        //[可删]
  'container_class'     => '',									//[可删]
  'container_id'	=> '',									//[可删]
  'menu_class'		=> 'menu',						                //[可删]
  'menu_id'		=> '',									//[可删]
  'echo'		=> true,							        //[可删]
  'fallback_cb'		=> 'wp_page_menu',		                                        //[可删]
  'before'		=> '',									//[可删]
  'after'		=> '',									//[可删]
  'link_before'		=> '',									//[可删]
  'link_after'		=> '',									//[可删]
  'items_wrap'		=> '<ul id="%1$s" class="%2$s">%3$s</ul>',	                        //[可删]
  'depth'		=> 0,								        //[可删]
  'walker'		=> ''									//[可删]
) );
?>
顶部导航栏加上之后变成了这样。

3.通过修改代码:
'menu_class' => 'nav navbar-nav',
就显示正常了。
4.终极的方法
比如原来的导航代码是:
<nav class="inner" id="menu">
	<div class="menu"><ul><li id="menu-item-6" class="menu-item menu-item-type-custom menu-item-object-custom current-menu-item current_page_item menu-item-home menu-item-6"><a href="http://www.kwko6.cn/">首页</a></li>
<li id="menu-item-2766" class="menu-item menu-item-type-post_type menu-item-object-page menu-item-2766"><a href="http://www.kwko6.cn/sample-page-2">关于我们</a></li>
<li id="menu-item-2743" class="menu-item menu-item-type-taxonomy menu-item-object-category menu-item-2743"><a href="http://www.kwko6.cn/cpzs">产品展示</a></li>
<li id="menu-item-9" class="menu-item menu-item-type-post_type menu-item-object-page menu-item-9"><a href="http://www.kwko6.cn/lxwm">联系我们</a></li>
</ul></div></nav>
就在items_wrap这里进行设定。
<?php
/*
wp_nav_menu( $args )
@参数 array $args, 传递此参数时用array(成员参数名=>成员参数值)
特别说明:
调用导航菜单时,可以直接复制以下代码。然后根据需要删除成员参数
*/
wp_nav_menu( array(
  'theme_location'              => '',                //[保留]导航别名
  'menu'                        => 'test1',           //[可删]期望显示的菜单,即后台的菜单名称
  'container'                   => 'navbtn',          //[可删]  容器标签
  'container_class'             => 'menu',            //[可删]   ul父节点class值
  'container_id'                => '',                //[可删]  ul父节点id值
  'menu_class'                  => '',                //[可删]  ul节点class值
  'menu_id'                     => 'menu',            //[可删]   ul节点id值
  'echo'                        => true,              //[可删]  是否输出菜单,默认为真
  'fallback_cb'                 => 'wp_page_menu',    //[可删]   菜单不存在时,返回默认菜单,设为false则不返回
  'before'                      => '',                //[可删]  链接前文本
  'after'                       => '',                //[可删]
  'link_before'                 => '',                //[可删]  链接文本前
  'link_after'                  => '',                //[可删]
  'items_wrap'                  => '<nav class="inner" id="menu"><div class="%2$s"><ul>%3$s</ul></div></nav>',
  'depth'                       => 0,                 //[可删]   菜单深度,默认0
  'walker'                      => ''                 //[可删]
) );
?>
备注:
container 是指
-
items_wrap的标准写法是
- %3$s
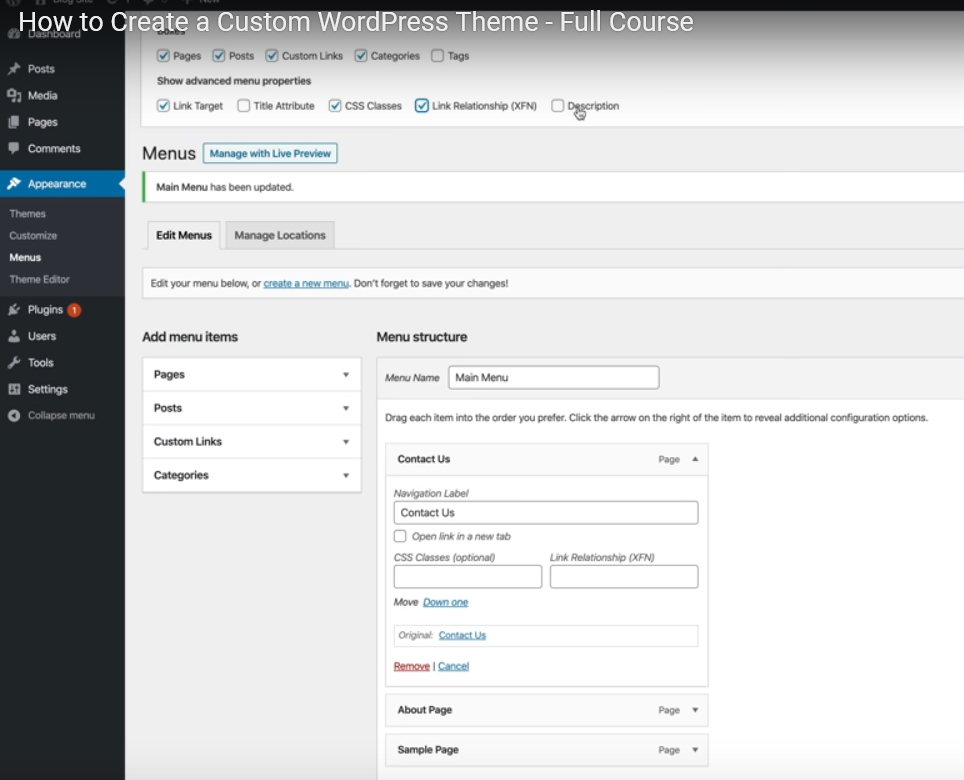
,如果要定制li的class,那么需要到页面那里进行设置:
(一)底部导航条
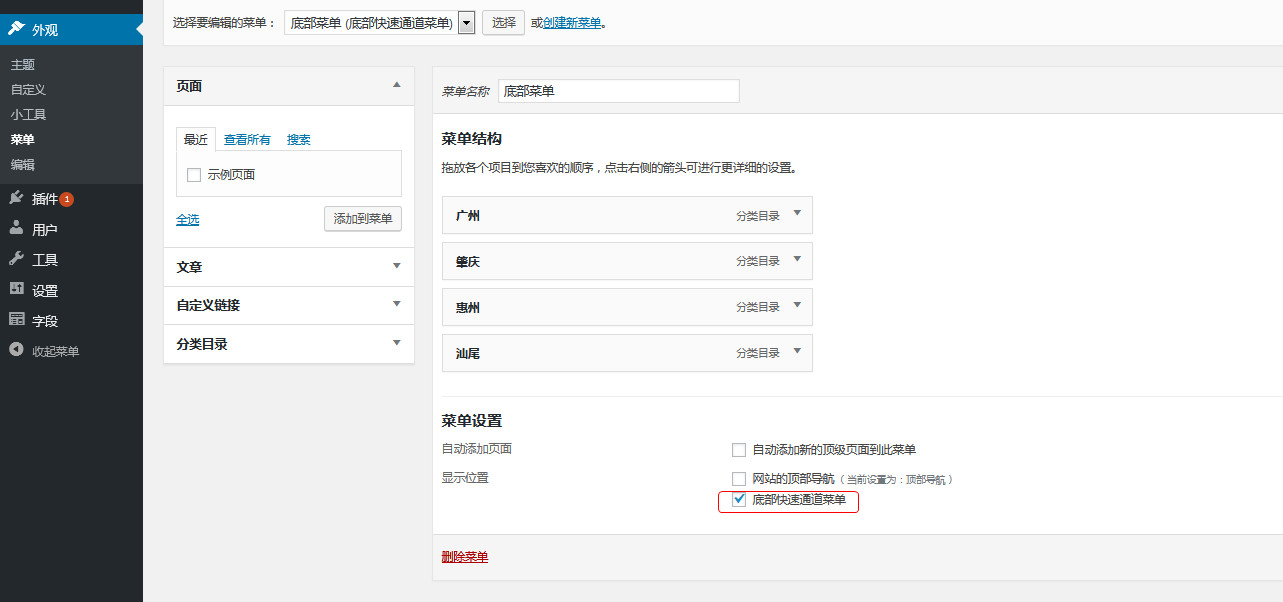
1.在后台建立一个菜单,并且与“底部快速通道菜单”绑定
2.加入调用代码。
3.显示效果

二、面包导航
1.函数
/**
* lingfeng_breadcrumbs()函数
* 功能是输出面包屑导航HTML代码
* @Param null			不需要输入任何参数
* @Return string		输出HTML代码
*/
function lingfeng_breadcrumbs() {
	/* === OPTIONS === */
	$text['home']     = '网站首页'; // text for the 'Home' link
	$text['category'] = '%s'; // text for a category page
	$text['search']   = '"%s"的搜索结果'; // text for a search results page
	$text['tag']      = '%s'; // text for a tag page
	$text['author']   = '%s'; // text for an author page
	$text['404']      = '404错误'; // text for the 404 page

	$show_current   = 1; // 1 - show current post/page/category title in breadcrumbs, 0 - don't show
	$show_on_home   = 1; // 1 - show breadcrumbs on the homepage, 0 - don't show
	$show_home_link = 1; // 1 - show the 'Home' link, 0 - don't show
	$show_title     = 1; // 1 - show the title for the links, 0 - don't show
	$delimiter      = ' » '; // delimiter between crumbs
	$before         = '<span class="current">'; // tag before the current crumb
	$after          = '</span>'; // tag after the current crumb
	/* === END OF OPTIONS === */

	global $post;
	$home_link    = home_url('/');
	$link_before  = '<span typeof="v:Breadcrumb">';
	$link_after   = '</span>';
	$link_attr    = ' rel="v:url" property="v:title"';
	$link         = $link_before . '<a' . $link_attr . ' href="%1$s">%2$s</a>' . $link_after;
	$parent_id    = $parent_id_2 = $post->post_parent;
	$frontpage_id = get_option('page_on_front');

	if (is_home() || is_front_page()) {

		if ($show_on_home == 1) echo '<div class="breadcrumbs"><a href="' . $home_link . '">' . $text['home'] . '</a></div>';

	} else {

		echo '<div class="breadcrumbs" xmlns:v="http://rdf.data-vocabulary.org/#">';
		if ($show_home_link == 1) {
			echo '<a href="' . $home_link . '" rel="v:url" property="v:title">' . $text['home'] . '</a>';
			if ($frontpage_id == 0 || $parent_id != $frontpage_id) echo $delimiter;
		}

		if ( is_category() ) {
			$this_cat = get_category(get_query_var('cat'), false);
			if ($this_cat->parent != 0) {
				$cats = get_category_parents($this_cat->parent, TRUE, $delimiter);
				if ($show_current == 0) $cats = preg_replace("#^(.+)$delimiter$#", "$1", $cats);
				$cats = str_replace('<a', $link_before . '<a' . $link_attr, $cats);
				$cats = str_replace('</a>', '</a>' . $link_after, $cats);
				if ($show_title == 0) $cats = preg_replace('/ title="(.*?)"/', '', $cats);
				echo $cats;
			}
			if ($show_current == 1) echo $before . sprintf($text['category'], single_cat_title('', false)) . $after;

		} elseif ( is_search() ) {
			echo $before . sprintf($text['search'], get_search_query()) . $after;

		} elseif ( is_day() ) {
			echo sprintf($link, get_year_link(get_the_time('Y')), get_the_time('Y')) . $delimiter;
			echo sprintf($link, get_month_link(get_the_time('Y'),get_the_time('m')), get_the_time('F')) . $delimiter;
			echo $before . get_the_time('d') . $after;

		} elseif ( is_month() ) {
			echo sprintf($link, get_year_link(get_the_time('Y')), get_the_time('Y')) . $delimiter;
			echo $before . get_the_time('F') . $after;

		} elseif ( is_year() ) {
			echo $before . get_the_time('Y') . $after;

		} elseif ( is_single() && !is_attachment() ) {
			if ( get_post_type() != 'post' ) {
				$post_type = get_post_type_object(get_post_type());
				$slug = $post_type->rewrite;
				printf($link, $home_link . $slug['slug'] . '/', $post_type->labels->singular_name);
				if ($show_current == 1) echo $delimiter . $before . get_the_title() . $after;
			} else {
				$cat = get_the_category(); $cat = $cat[0];
				$cats = get_category_parents($cat, TRUE, $delimiter);
				if ($show_current == 0) $cats = preg_replace("#^(.+)$delimiter$#", "$1", $cats);
				$cats = str_replace('<a', $link_before . '<a' . $link_attr, $cats);
				$cats = str_replace('</a>', '</a>' . $link_after, $cats);
				if ($show_title == 0) $cats = preg_replace('/ title="(.*?)"/', '', $cats);
				echo $cats;
				if ($show_current == 1) echo $before . get_the_title() . $after;
			}

		} elseif ( !is_single() && !is_page() && get_post_type() != 'post' && !is_404() ) {
			$post_type = get_post_type_object(get_post_type());
			echo $before . $post_type->labels->singular_name . $after;

		} elseif ( is_attachment() ) {
			$parent = get_post($parent_id);
			$cat = get_the_category($parent->ID); $cat = $cat[0];
			if ($cat) {
				$cats = get_category_parents($cat, TRUE, $delimiter);
				$cats = str_replace('<a', $link_before . '<a' . $link_attr, $cats);
				$cats = str_replace('</a>', '</a>' . $link_after, $cats);
				if ($show_title == 0) $cats = preg_replace('/ title="(.*?)"/', '', $cats);
				echo $cats;
			}
			printf($link, get_permalink($parent), $parent->post_title);
			if ($show_current == 1) echo $delimiter . $before . get_the_title() . $after;

		} elseif ( is_page() && !$parent_id ) {
			if ($show_current == 1) echo $before . get_the_title() . $after;

		} elseif ( is_page() && $parent_id ) {
			if ($parent_id != $frontpage_id) {
				$breadcrumbs = array();
				while ($parent_id) {
					$page = get_page($parent_id);
					if ($parent_id != $frontpage_id) {
						$breadcrumbs[] = sprintf($link, get_permalink($page->ID), get_the_title($page->ID));
					}
					$parent_id = $page->post_parent;
				}
				$breadcrumbs = array_reverse($breadcrumbs);
				for ($i = 0; $i < count($breadcrumbs); $i++) {
					echo $breadcrumbs[$i];
					if ($i != count($breadcrumbs)-1) echo $delimiter;
				}
			}
			if ($show_current == 1) {
				if ($show_home_link == 1 || ($parent_id_2 != 0 && $parent_id_2 != $frontpage_id)) echo $delimiter;
				echo $before . get_the_title() . $after;
			}

		} elseif ( is_tag() ) {
			echo $before . sprintf($text['tag'], single_tag_title('', false)) . $after;

		} elseif ( is_author() ) {
	 		global $author;
			$userdata = get_userdata($author);
			echo $before . sprintf($text['author'], $userdata->display_name) . $after;

		} elseif ( is_404() ) {
			echo $before . $text['404'] . $after;

		} elseif ( has_post_format() && !is_singular() ) {
			echo get_post_format_string( get_post_format() );
		}

		if ( get_query_var('paged') ) {
			if ( is_category() || is_day() || is_month() || is_year() || is_search() || is_tag() || is_author() ) echo ' (';
			echo __('Page') . ' ' . get_query_var('paged');
			if ( is_category() || is_day() || is_month() || is_year() || is_search() || is_tag() || is_author() ) echo ')';
		}

		echo '</div><!-- .breadcrumbs -->';

	}
} // end dimox_breadcrumbs()
在function.php加入上面的代码,在需要调用的地方直接用下面的命令即可。
<?php lingfeng_breadcrumbs(); ?>
2.调用。
三、文章详情页
文章详情页的文件名为single.php,并修改CSS的路径。在创建这个文件前,wordpress是以index.php来显示文章的。
详情页的keywords、desc
<title><?php the_title(); ?></title>
 <?php if( have_posts() ) : while( have_posts() ) : the_post(); ?>
<meta name="keywords" content="<?php the_title(); ?>" />
<meta name="description" content="<?php echo lingfeng_strimwidth(get_the_content(),150); ?>" />
这个函数见:这里
2.页面标签
获取文章标签,并显示标签列表:
<?php
// 获取当前文章的标签
$tags = get_the_tags();
if ($tags) {
    echo '<div class="tags">';
    echo '<span>Tags:</span>';
    foreach ($tags as $tag) {
        echo '<a href="' . get_tag_link($tag->term_id) . '">' . $tag->name . '</a>';
    }
    echo '</div>';
}
?>
四、侧边栏
1.函数
register_sidebar( array(
  'name'						=> '文章侧边栏',					//侧边栏的名称
  'id'								=> 'siderbar-01',					//侧边栏的编号
  'description'				=> '在文章详情页显示',					//侧边栏的描述
  'class'						=> '',
  'before_widget'			=> '',
  'after_widget'			=> '',
  'before_title'				=> '<h2 class="widgettitle">',
  'after_title'					=> '</h2>'
) );
在functions.php添加以上代码之后,在wordpress后台会多一个“小工具”的菜单。
注意:
这里的before_widget显示的是在“before_title”,“after_title”外面的东西,即将title和li都包围起来的那个div.
2.调用侧边栏
<?php if ( is_active_sidebar( 'siderbar-01' ) ) : ?>
	 <?php dynamic_sidebar( 'siderbar-01' ); ?>
<?php else: ?>
	//提示用户
	//或者,显示一些默认的边栏效果
<?php endif; ?>
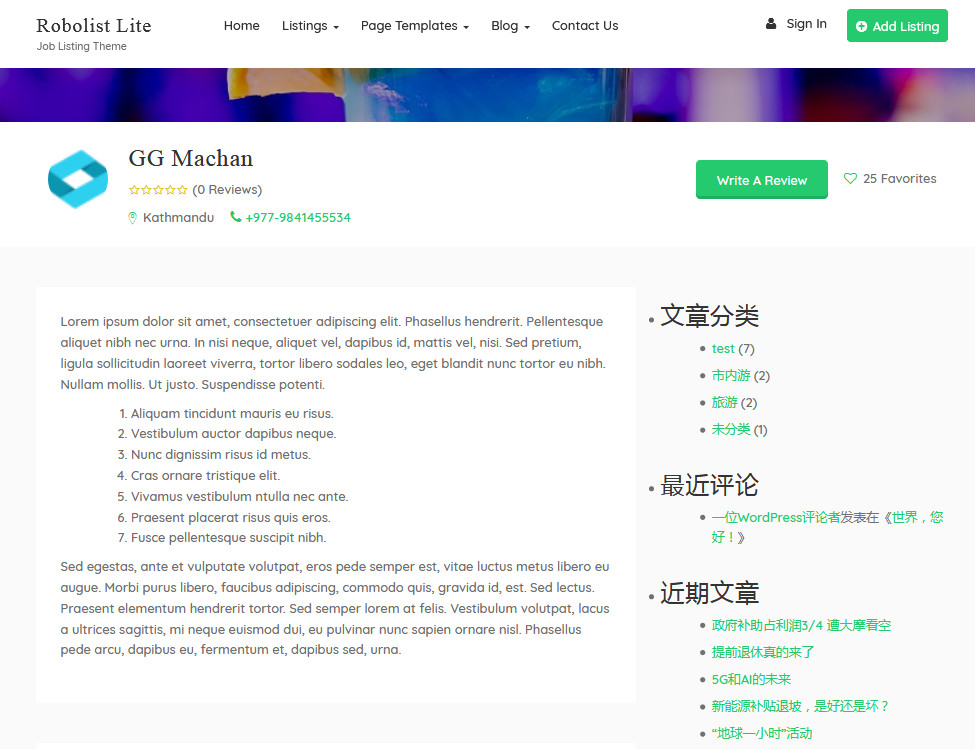
3.效果预览
在“小工具”菜单那里给侧边栏添加内容,然后在前端就可以看到效果了。
4.显示文章内容
<?php if( have_posts() ) : while( have_posts() ) : the_post(); ?>
<?php the_content(); ?>
<?php endwhile; ?>
<?php endif; ?>
注意:
这个也要放到主循环里面。
五、拆分页面
建立三个文件sidebar.php, footer.php, header.php,并将相应的代码复制过去。
<?php get_header();?>
<?php get_sidebar();?>
<?php get_footer();?>
关于get_header的用法,还可以这样用:建立一个header-menu.php文件,然后将内容放进去,在需要调用的地方用下面的代码:
<?php get_header(menu); ?>
参考:https://www.jb51.net/article/77735.htm
六、上一页、下一页
代码:
<div class="related">
	<span class="r-left"><?php next_post_link('«上一篇:%link'); ?> </span>
	<span class="r-right"><?php previous_post_link('»下一篇:%link'); ?> </span>
	<div class="clear"></div>
</div><!-- .related -->
效果展示:

七、评论框
<?php comments_template(); ?>
效果演示:
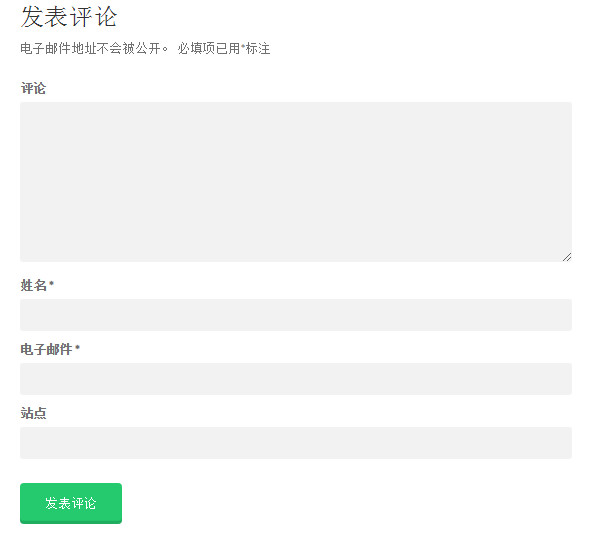
如果对评论框的样式有要求,需要自己设定评论框的样式,可以看这里
八、页面模板
直接使用single.php,然后稍微修改即可。
九、友情链接
WordPress其实从3.5版本之后就在后台默认隐藏了链接管理功能,而我们通常需要在设置友情链接的时候需要用到这个功能,所以我们需要重新启用这个功能,直接在function.php添加以下代码:
add_filter( 'pre_option_link_manager_enabled', '__return_true' );
然后在要插入链接的地方加上下面这行代码即可:
<div class="inner" id="friendlinks">
	<ul>
		<li><strong>友情链接:</strong></li>
		<?php wp_list_bookmarks('title_li=&categorize=0'); ?>
	</ul>
</div>
九、分类目录
用的是archive.php。
如果你想要让某一个分类目录使用单独的模板,比如给id为5的分类目录单独创建模板,可以建立一个category-5.php文件即可。
获得当前分类的名称:
<?php single_cat_title(); ?>
十、分页
直接调用自编的分页函数,显示效果并不是很好。

直接用插件吧。
1.安装插件WP-PageNavi。
2.在需要分页的地方插入以下代码:
<?php if(function_exists('wp_pagenavi')) { wp_pagenavi(); } ?>
3.成果展示

十一、一级分类、二级分类使用不同的模板
实测成功!
1.在模板函数文件functions.php中加入以下的函数。
function get_category_parent($parent)
{
global $cat;
$parent=get_category($cat);
if($parent->parent)return ture;
else
return false;
}
2.在分类模板文件archive.php中使用以下语句进行父分类与子分类的判断。(且只需要这段代码就可以了)
<?php if(get_category_parent($parent)==false){
include(TEMPLATEPATH . '/category-fu.php'); //父分类
}
else {
include(TEMPLATEPATH . '/category-zi.php'); //子分类
}
?>
十二、一级分类页面显示二级分类文章列表
<?php
global $cat;
$cats = get_categories(array(
'child_of' => $cat,
'parent' => $cat,
'hide_empty' => 0
));
$c = get_category($cat);
if(empty($cats)){
?>

<?php
}else{
foreach($cats as $the_cat){
$posts = get_posts(array(
'category' => $the_cat->cat_ID,
'numberposts' => 10,
));
if(!empty($posts)){
echo '
<div class="col-xs-6 col-md-6">
<div class="mten-exam-list">
<h3 class="exam-title">'.$the_cat->name.'<a href="'.get_category_link($the_cat).'"><span class="fr col_6">更多</span></a></h3>
<ul>
';

$a = 1;
foreach($posts as $post){
	if ($a==1 ) {
		echo'
		<div class="exam-intro">
			 <a href="'.get_permalink($post->ID).'">
				<img src="http://127.0.0.1/18wp/wp-content/themes/simplegreen/static/picture/defaultpic.gif" alt="在线英语口语培训" class="fl" width="130"  height="80" />
				<div class="exam-intro-content fr">
				<h5>'.$post->post_title.'</h5>
				<p></p>
				</div>
				</a>
				</div>
		';
	} else {
		echo '
		<li><a title="'.$post->post_title.'" href="'.get_permalink($post->ID).'">'.$post->post_title.'</a></li>';
	}
	$a += 1;

}
echo '</ul>
</div>
</div>';
}
}
}
?>
效果展示:

十三、
如果要不同的目录套用不同的模板,只需要设定模板的别名,然后将模板命名为category-别名.php就可以了。
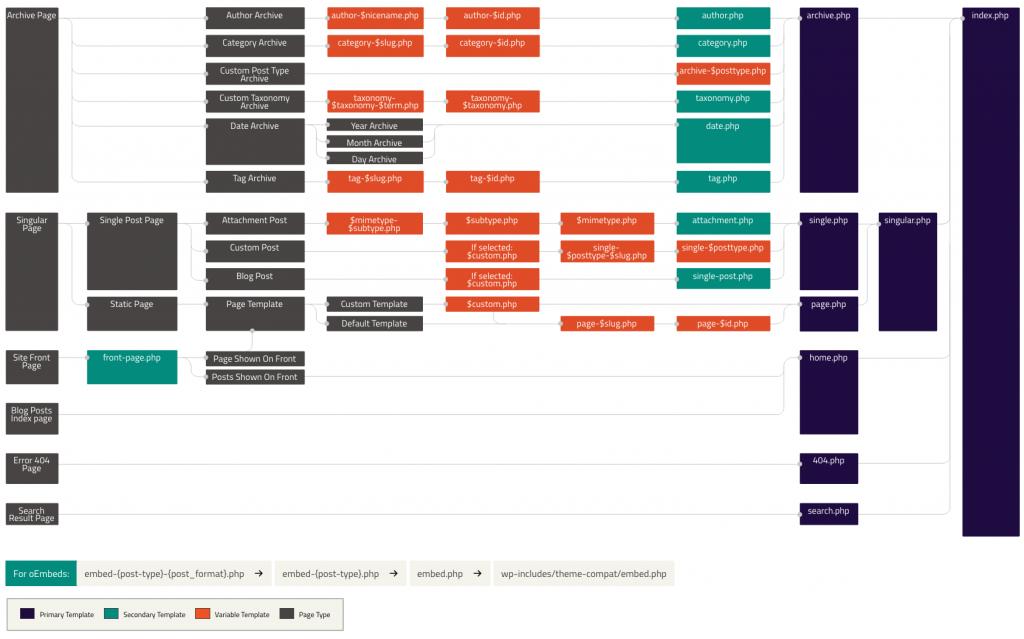
十四、不同分类下的文章调用不同的模板
比如我们可以在主题的根目录创建3个文章模板文件,分别命名为 single001.php , single002.php 和 single003.php,然后我们希望 ID 为 2 和 3 的分类使用 single001.php,ID为 7 的分类使用 single002.php ,其他分类使用 single003.php,那么,我们可以在 single.php 文件写入下面的代码:
<?php
if ( in_category(array( 2,3 )) ) {
	get_template_part('single001' );
} elseif ( in_category( 7 )) {
	get_template_part('single002' );
} else {
	get_template_part('single003' );
}
?>
更多方法:
https://www.wpdaxue.com/custom-single-post-template.html

