一、创建自己的第一个GUI界面
成果图:
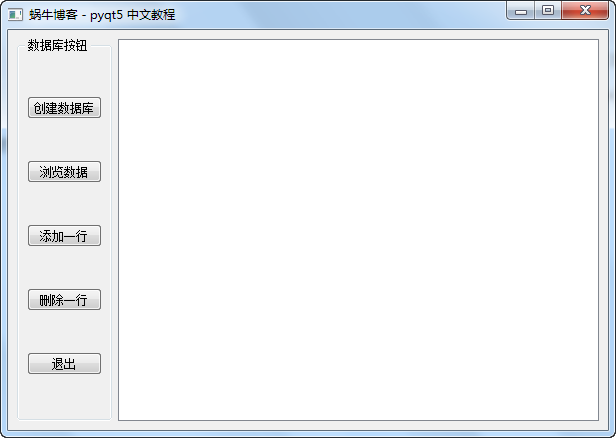
这时所有按钮都无效果,但是退出按钮可以正常工作。
代码如下:
from PyQt5 import QtGui,QtCore,QtWidgets,QtSql
from PyQt5.QtWidgets import QApplication, QWidget
import sys

'''
    蜗牛博客 - pyqt5 中文教程
'''

class MainUi(QtWidgets.QMainWindow):

    def __init__(self):
        super().__init__()
        self.initUi()

    # 初始化UI界面
    def initUi(self):
        # 设置窗口标题
        self.setWindowTitle("蜗牛博客 - pyqt5 中文教程")
        # 设置窗口大小
        self.resize(600,400)

        # 创建一个窗口部件
        self.widget = QtWidgets.QWidget()
        # 创建一个网格布局
        self.grid_layout = QtWidgets.QGridLayout()
        # 设置窗口部件的布局为网格布局
        self.widget.setLayout(self.grid_layout)

        # 创建一个按钮组
        self.group_box = QtWidgets.QGroupBox('数据库按钮')
        self.group_box_layout = QtWidgets.QVBoxLayout()
        self.group_box.setLayout(self.group_box_layout)
        # 创建一个表格部件
        self.table_widget = QtWidgets.QTableView()
        # 将上述两个部件添加到网格布局中
        self.grid_layout.addWidget(self.group_box,0,0)
        self.grid_layout.addWidget(self.table_widget,0,1)

        # 创建按钮组的按钮
        self.b_create_db = QtWidgets.QPushButton("创建数据库")
        # self.b_create_db.clicked.connect(self.create_db)
        self.b_view_data = QtWidgets.QPushButton("浏览数据")
        self.b_add_row = QtWidgets.QPushButton("添加一行")
        self.b_delete_row = QtWidgets.QPushButton("删除一行")
        self.b_close = QtWidgets.QPushButton("退出")
        self.b_close.clicked.connect(self.close)
        # 添加按钮到按钮组中
        self.group_box_layout.addWidget(self.b_create_db)
        self.group_box_layout.addWidget(self.b_view_data)
        self.group_box_layout.addWidget(self.b_add_row)
        self.group_box_layout.addWidget(self.b_delete_row)
        self.group_box_layout.addWidget(self.b_close)

        # 设置UI界面的核心部件
        self.setCentralWidget(self.widget)
if __name__ == '__main__':
    app = QApplication(sys.argv)
    ex = MainUi()
    ex.show()
    sys.exit(app.exec_())
说明:
class MainUi(QtWidgets.QMainWindow):这里的QtWidgets.QMainWindow表示该窗口的类型,这里是主窗口类型。所以设置成当QtWidgets.QMainWindow。你的窗口是一个会话框时你需要设置成:QtWidgets.QDialog。
app = QApplication(sys.argv)是实例化了一个应用程序对象QApplication(),在PyQt5中,每个应用程序都必须实例化一个QApplication(),如果没有这一行代码,则会出现“QWidget: Must construct a QApplication before a QWidget”的错误提示。
ex = MainUi()表示创建了一个MainUi()对象。
ex.show()使用QWidget对象的show()方法将创建的窗口显示出来。
sys.exit(app.exec_())表示调用应用程序对象的exec_()方法来运行程序的主循环,并使用sys.exit()方法确保程序能够完美的退出。
二、创建数据库功能
本来想使用Mysql数据库,可是我测试了一下,出现了以下的错误提示:
QSqlDatabase: QMYSQL driver not loaded
QSqlDatabase: available drivers: QSQLITE QODBC QODBC3
QSqlQuery::exec: database not open
QSqlQuery::exec: database not open
QSqlQuery::exec: database not open
QSqlQuery::exec: database not open
那就只好以Sqlite数据库为例。
在MainUi()类中,写一个创建数据库的函数create_db()
# 创建数据库
    def create_db(self):
        try:
            # 调用输入框获取数据库名称
            db_text, db_action = QtWidgets.QInputDialog.getText(self, '数据库名称', '请输入数据库名称',
                                                                QtWidgets.QLineEdit.Normal)
            if (db_text.replace(' ', '') != '') and (db_action is True):
                print(db_text)
                self.db_name = db_text
                # 添加一个sqlite数据库连接并打开
                db = QtSql.QSqlDatabase.addDatabase('QSQLITE')
                db.setDatabaseName('{}.sqlite'.format(db_text))
                db.open()
                # 实例化一个查询对象
                query = QtSql.QSqlQuery()
                # 创建一个数据库表
                query.exec_("create table zmister(ID int primary key, "
                            "site_name varchar(20), site_url varchar(100))")
                # 插入三条数据
                query.exec_("insert into zmister values(1000, '蜗牛博客', 'http://www.snailtoday.com')")
                query.exec_("insert into zmister values(1001, '百度', 'http://www.baidu.com')")
                query.exec_("insert into zmister values(1002, '腾讯', 'http://www.qq.com')")
                print('创建数据库成功')
        except Exception as e:
            print(e)
然后通过下面这一行代码,将这个函数绑定到按钮上。
self.b_create_db.clicked.connect(self.create_db)
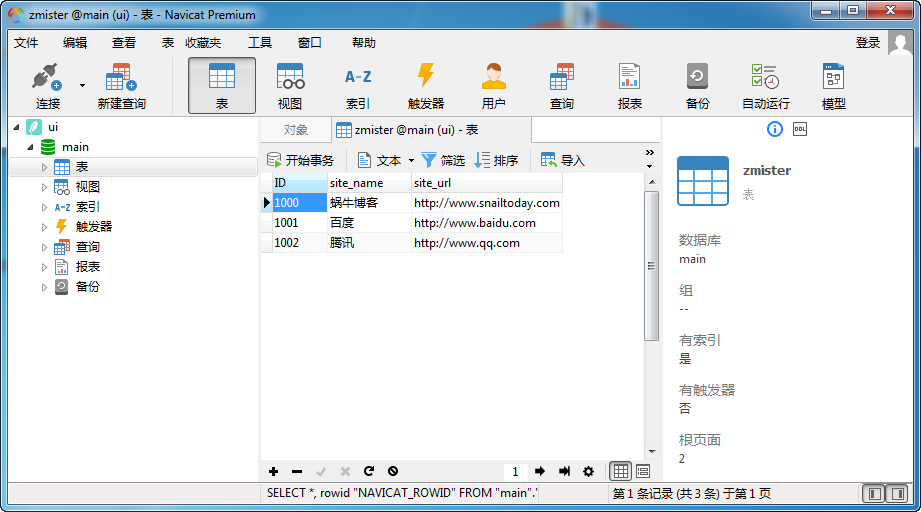
这样我们测试一下,然后用Navicat打开刚刚建立的Sqlite数据库,就可以看到结果了。
三、查看数据库
我们在创建UI界面的时候,在界面的右方放置了一个QTableView()部件,我们的数据库数据将显示在这上面。
    # 浏览数据
    def view_data(self):
        # 实例化一个可编辑数据模型
        self.model = QtSql.QSqlTableModel()
        self.table_widget.setModel(self.model)

        self.model.setTable('zmister') # 设置数据模型的数据表
        self.model.setEditStrategy(QtSql.QSqlTableModel.OnFieldChange) # 允许字段更改
        self.model.select() # 查询所有数据
        # 设置表格头
        self.model.setHeaderData(0,QtCore.Qt.Horizontal,'ID')
        self.model.setHeaderData(1, QtCore.Qt.Horizontal, '站点名称')
        self.model.setHeaderData(2, QtCore.Qt.Horizontal, '站点地址')
然后,将view_data()方法绑定在UI界面的【浏览数据】按钮的点击事件中
self.b_view_data.clicked.connect(self.view_data)
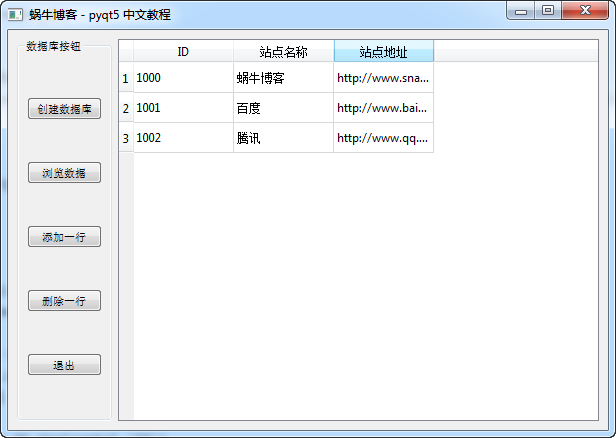
这样,创建数据之后,点击一下“浏览数据”按钮,就可以看到显示的数据。
不过这里有一个小bug,下次程序重新开启之后,点击“浏览数据”按钮,啥都没有,只能在新建数据之后才能浏览。
四、添加和删除数据
继续写两个函数。
    # 添加一行数据行
    def add_row_data(self):
        # 如果存在实例化的数据模型对象
        if self.model:
            self.model.insertRows(self.model.rowCount(), 1)
        else:
            self.create_db()

    # 删除一行数据
    def del_row_data(self):
        if self.model:
            self.model.removeRow(self.table_widget.currentIndex().row())
        else:
            self.create_db()
然后将这两个方法分别绑定在【添加一行】和【删除一行】按钮的点击事件上:
self.b_add_row.clicked.connect(self.add_row_data)
self.b_delete_row.clicked.connect(self.del_row_data)
这样就可以实现添加、删除一行的功能了。
附最终的按钮代码:
self.b_create_db = QtWidgets.QPushButton("创建数据库")
self.b_create_db.clicked.connect(self.create_db)
self.b_view_data = QtWidgets.QPushButton("浏览数据")
self.b_view_data.clicked.connect(self.view_data)
self.b_add_row = QtWidgets.QPushButton("添加一行")
self.b_add_row.clicked.connect(self.add_row_data)
self.b_delete_row = QtWidgets.QPushButton("删除一行")
self.b_delete_row.clicked.connect(self.del_row_data)
五、python图形界面生成exe
下面我们将上面的程序打包成exe,能够在没有安装python的电脑上也能使用。
解决方案一:pyinstaller
要想将python程序打包成exe,需要pyinstaller和pywin32这两个包的支持。
使用pip install pyinstaller命令安装pyinstaller,另外安装pywin32前最好用pip list查看一下自己电脑上是否已经安装好了pywin32,如果没有的话,可以到这里下载,然后执行exe程序安装。
cmd进入到你的python文件所在的目录,假如你的文件为ui.py,执行以下代码:
pyinstaller --onefile --nowindowed ui.py
如果要加上icon的话:
pyinstaller --onefile --nowindowed --icon=" D:\Queena\PyCharmProjects\dist1\computer_three.ico" ui.py
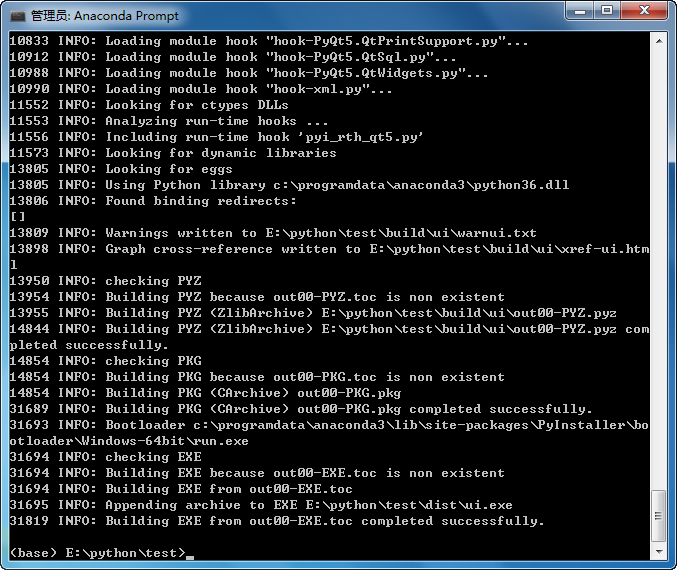
就会在当前文件下形成build文件夹、dist文件夹和.spec文件。dist里有一个ui.exe可执行文件。
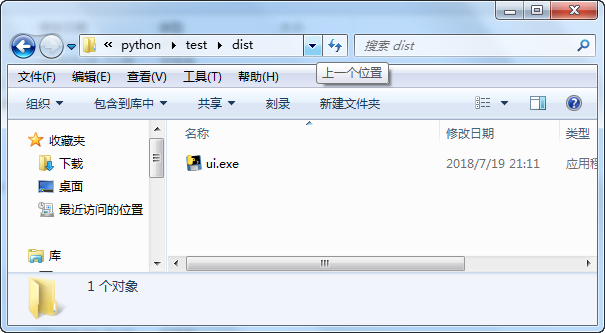
不过使用这种方法,其他的py文件生成的exe文件都可以执行,pyqt5的就不行。
而且后来在网上看别人说pyinstaller打包PyQT5开发的东西也不行。
没办法,办能另想办法。
解决方案二、使用py2exe
首先从这个网站下载py2exe,然后使用pip install py2exe-0.9.2.2-cp34-none-win_amd64.whl命令安装,没想到安装时出现如下的错误提示:py2exe-0.9.2.2-cp34-none-win_amd64.whl is not a supported wheel on this platform
没办法,我只好用conda create -n py34 python=3.4命令,新建立了一个py3.4的环境。
然后在ui.py文件所在目录建立了一个exe.py文件,代码如下:
from distutils.core import setup
import py2exe
import sys

#this allows to run it with a simple double click.
sys.argv.append('py2exe')

py2exe_options = {
        "includes": ["sip"],
        "dll_excludes": ["MSVCP90.dll",],
        "compressed": 1,
        "optimize": 2,
        "ascii": 0,
        "bundle_files": 1,
        }

setup(
      name = 'PyQt Demo',
      version = '1.0',
      windows = ['ui.py',],
      zipfile = None,
      options = {'py2exe': py2exe_options}
      )
然后执行的时候又说没找到pyqt5,于是又安装pyqt5,结果安装pyqt5快完成时,又出现了如下的错误提示:
Could not find a version that satisfies the requirement sip>=4.19.1 (from PyQt) (from versions: )
o matching distribution found for sip>=4.19.1 (from PyQt5)。
在网上看了一下,有人遇到同样的问题,好像是py3.4用pip install pyqt5安装就会出错。
结果执行exe.py时,也出错。
Traceback (most recent call last):
File "exe.py", line 22, in
options = {'py2exe': py2exe_options}
File "C:\ProgramData\Anaconda3\envs\py34\lib\distutils\core.py", line 148, in
setup
dist.run_commands()
File "C:\ProgramData\Anaconda3\envs\py34\lib\distutils\dist.py", line 955, in
run_commands
self.run_command(cmd)
File "C:\ProgramData\Anaconda3\envs\py34\lib\distutils\dist.py", line 974, in
run_command
cmd_obj.run()
File "C:\ProgramData\Anaconda3\envs\py34\lib\site-packages\py2exe\distutils_bu
ildexe.py", line 188, in run
self._run()
File "C:\ProgramData\Anaconda3\envs\py34\lib\site-packages\py2exe\distutils_bu
ildexe.py", line 267, in _run
builder.analyze()
File "C:\ProgramData\Anaconda3\envs\py34\lib\site-packages\py2exe\runtime.py",
line 164, in analyze
mf.import_hook(modname)
File "C:\ProgramData\Anaconda3\envs\py34\lib\site-packages\py2exe\mf3.py", lin
e 120, in import_hook
module = self._gcd_import(name)
File "C:\ProgramData\Anaconda3\envs\py34\lib\site-packages\py2exe\mf3.py", lin
e 274, in _gcd_import
return self._find_and_load(name)
File "C:\ProgramData\Anaconda3\envs\py34\lib\site-packages\py2exe\mf3.py", lin
e 337, in _find_and_load
raise ImportError(name)
ImportError: sip
虽然后来在网上找到安装sip的的方法,不过太麻烦了。
解决方案三、使用cx_Freeze
首先在你要打包的py文件的相同文件夹内,写一个exe.py文件
from cx_Freeze import setup, Executable

setup(name='test to exe',
      version='0.1',
      description='test from py file to exe file',
      executables=[Executable("ui.py")]

      )
然后cmd输入 python exe.py build命令,然后在相同目录中会生成一个bulid的目录,再进去exe.win-amd64-3.6目录,就会看到有一个ui.exe的文件。这时点击运行发发现如下的错误提示:
This application failed to start because it could not find or load the Qt platform plugin
这时需要将C:\ProgramData\Anaconda3\Library\plugins目录下的“platforms”这个文件夹copy到ui.exe所在的文件夹。然后再执行ui.exe,就可以正常运行了。
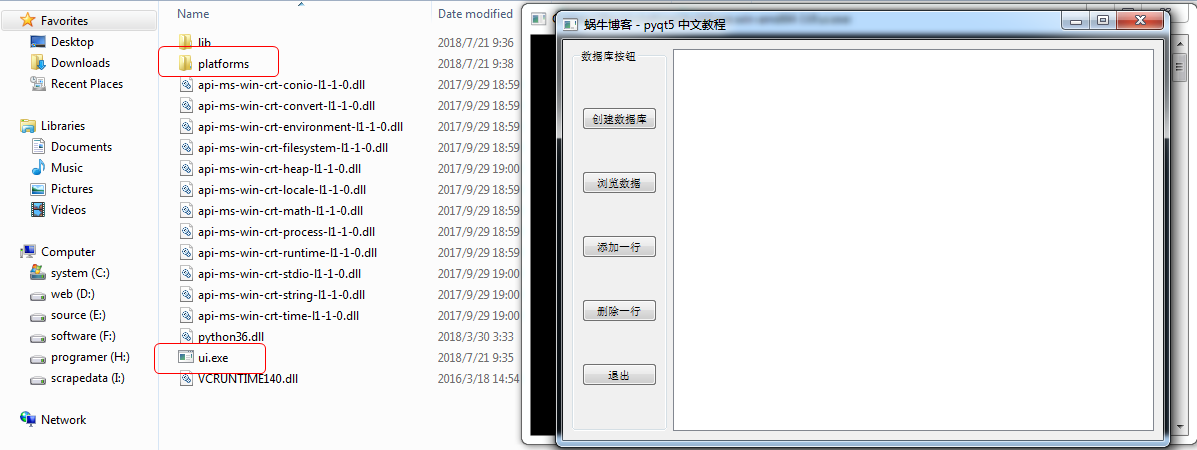
小提示:
如果你不是用的anaconda,就需要到其他目录中去找,比如,有的platform文件夹位于D:\Qt\Qt5.4.0\5.4\msvc2013_64\plugins\platforms。

